> ## Documentation Index
> Fetch the complete documentation index at: https://docs.every.ai/llms.txt
> Use this file to discover all available pages before exploring further.
# Bookings
> Let clients book appointments through your public booking page with availability management, payment collection, and automated confirmations
## Overview
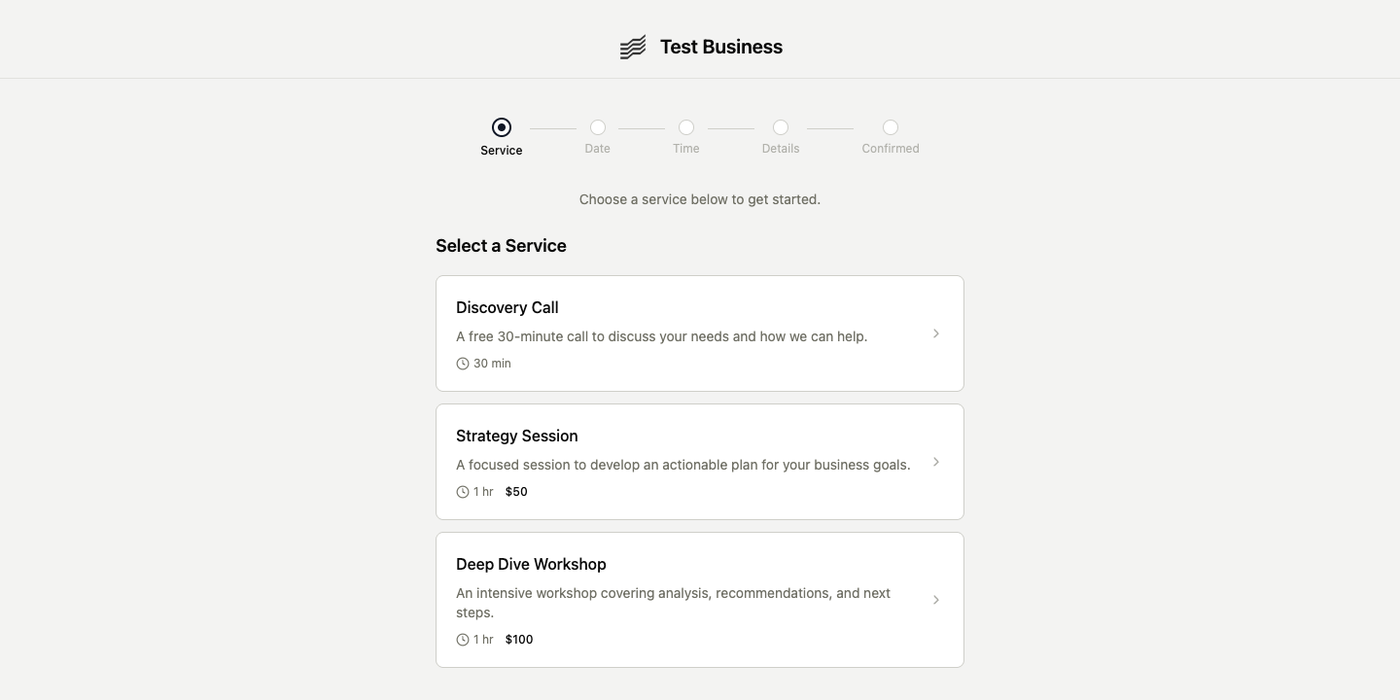
Bookings let clients self-schedule appointments through your public booking page at `{your-slug}.every.ai/book`. You choose which services are bookable, set availability and payment requirements, then share the link. Clients pick a service, choose a time, enter their details, pay if required, and receive confirmation automatically.
View and manage all your bookings in Every
**Ask Every Agent:** Work with bookings using natural language:
* "Create a booking for Sarah Chen next Tuesday at 2pm"
* "Show me all upcoming bookings this week"
* "Cancel the booking with John Smith on Friday"
## How It Works
**For you:**
1. Create the services you want to offer online
2. Configure booking settings, availability, and payment behavior
3. Share your booking link: `{your-slug}.every.ai/book`
**For your clients:**
1. Visit your booking page and select a service
2. Pick an available date and time in their local timezone
3. Fill in their details
4. Pay if required, or skip payment for free/schedule-later bookings
5. Receive confirmation email with a calendar export
`/book` is the current public booking path. Older `/booking` links still redirect for compatibility.
 ## Booking Modes
Every published service uses one of three booking modes:
| Mode | How It Works | Best For |
| ------------------ | -------------------------------------------------------------------------- | ----------------------------------------------------------- |
| **Standard** | Client picks a date and time and completes payment behavior you configured | Paid consultations, fixed sessions, structured appointments |
| **Free** | Client picks a date and time with no payment step | Discovery calls, introductions, free consults |
| **Schedule Later** | Client submits a request and you schedule the final time afterward | Custom engagements that need coordination |
Booking behavior is configured per service in Booking Settings. Different services can use different modes.
## Payment Options
For paid services, you can choose when payment happens:
| Payment Timing | Description |
| ---------------------- | -------------------------------------------------------------------------------------- |
| **No payment** | No charge collected |
| **Pay at booking** | Client pays immediately through Stripe Checkout |
| **Pay before service** | Client's card is collected at booking and charged automatically before the appointment |
Requiring payment at booking reduces no-shows for higher-value sessions.
Payment collection requires a connected Stripe account. Set up Stripe in [Settings → Payments](https://every.ai/settings/payments) first.
## Configuring Your Booking Page
Go to [**Booking Settings**](https://every.ai/clients/bookings/settings) to configure your booking page.
## Booking Modes
Every published service uses one of three booking modes:
| Mode | How It Works | Best For |
| ------------------ | -------------------------------------------------------------------------- | ----------------------------------------------------------- |
| **Standard** | Client picks a date and time and completes payment behavior you configured | Paid consultations, fixed sessions, structured appointments |
| **Free** | Client picks a date and time with no payment step | Discovery calls, introductions, free consults |
| **Schedule Later** | Client submits a request and you schedule the final time afterward | Custom engagements that need coordination |
Booking behavior is configured per service in Booking Settings. Different services can use different modes.
## Payment Options
For paid services, you can choose when payment happens:
| Payment Timing | Description |
| ---------------------- | -------------------------------------------------------------------------------------- |
| **No payment** | No charge collected |
| **Pay at booking** | Client pays immediately through Stripe Checkout |
| **Pay before service** | Client's card is collected at booking and charged automatically before the appointment |
Requiring payment at booking reduces no-shows for higher-value sessions.
Payment collection requires a connected Stripe account. Set up Stripe in [Settings → Payments](https://every.ai/settings/payments) first.
## Configuring Your Booking Page
Go to [**Booking Settings**](https://every.ai/clients/bookings/settings) to configure your booking page.
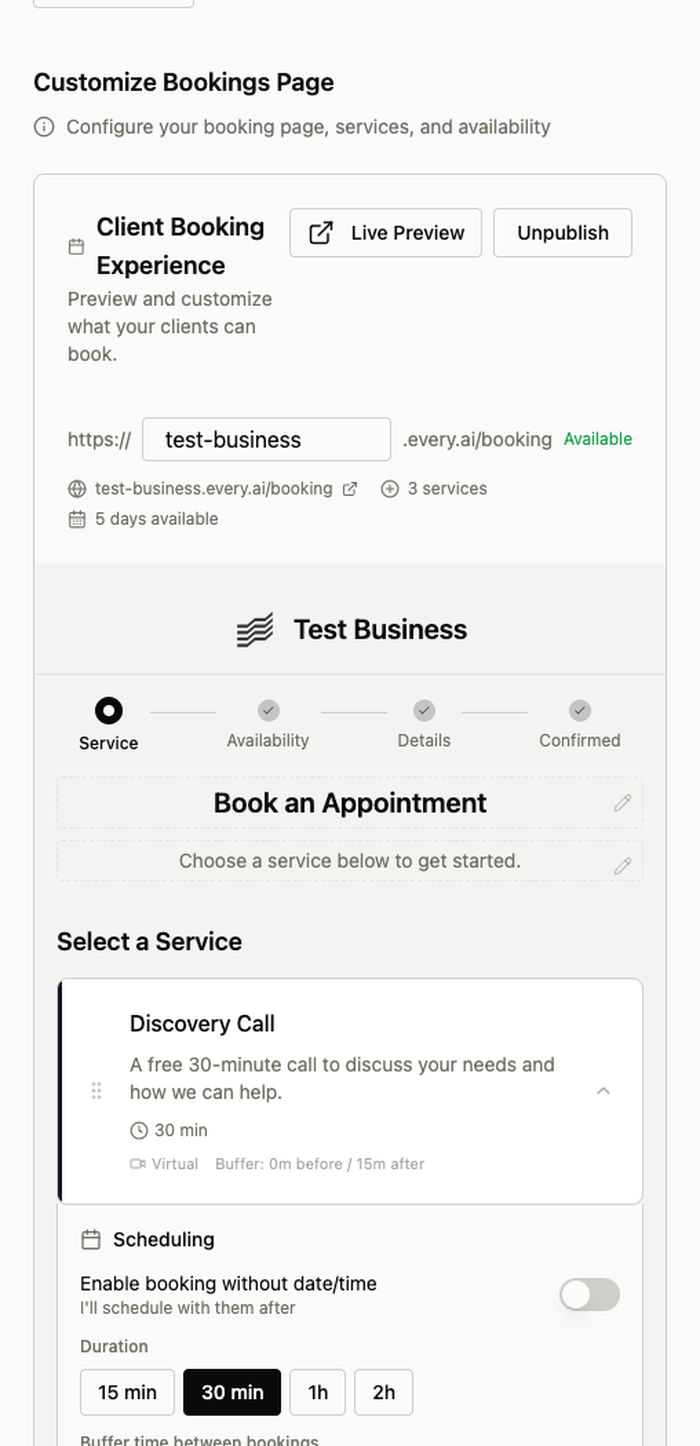 ### Selecting Bookable Services
Your booking page uses your existing [Services](/billing/services-and-products). In booking settings, select which services should appear on your public booking page. Each one can have its own booking mode, payment behavior, and configuration.
You do not need a separate booking-only catalog. Use the same services you already quote and invoice.
### Availability Schedule
Set your weekly availability with day-of-week and time ranges, for example Monday to Friday from 9:00 AM to 5:00 PM. You configure availability in your timezone and clients see those times converted automatically.
Use **date-specific overrides** to block holidays or add special availability on specific days.
### Google Calendar Integration
Connect Google Calendar to:
* Block busy slots so unavailable times do not appear
* Create calendar events automatically when bookings are confirmed
This keeps your published schedule aligned with your actual calendar.
### Booking Policy
Add a booking policy using the rich text editor. This appears on your public booking page and can include cancellation terms, preparation instructions, or anything else clients should know before booking.
## Managing Bookings
Go to [**Bookings**](https://every.ai/clients/bookings) to view all bookings.
### Selecting Bookable Services
Your booking page uses your existing [Services](/billing/services-and-products). In booking settings, select which services should appear on your public booking page. Each one can have its own booking mode, payment behavior, and configuration.
You do not need a separate booking-only catalog. Use the same services you already quote and invoice.
### Availability Schedule
Set your weekly availability with day-of-week and time ranges, for example Monday to Friday from 9:00 AM to 5:00 PM. You configure availability in your timezone and clients see those times converted automatically.
Use **date-specific overrides** to block holidays or add special availability on specific days.
### Google Calendar Integration
Connect Google Calendar to:
* Block busy slots so unavailable times do not appear
* Create calendar events automatically when bookings are confirmed
This keeps your published schedule aligned with your actual calendar.
### Booking Policy
Add a booking policy using the rich text editor. This appears on your public booking page and can include cancellation terms, preparation instructions, or anything else clients should know before booking.
## Managing Bookings
Go to [**Bookings**](https://every.ai/clients/bookings) to view all bookings.
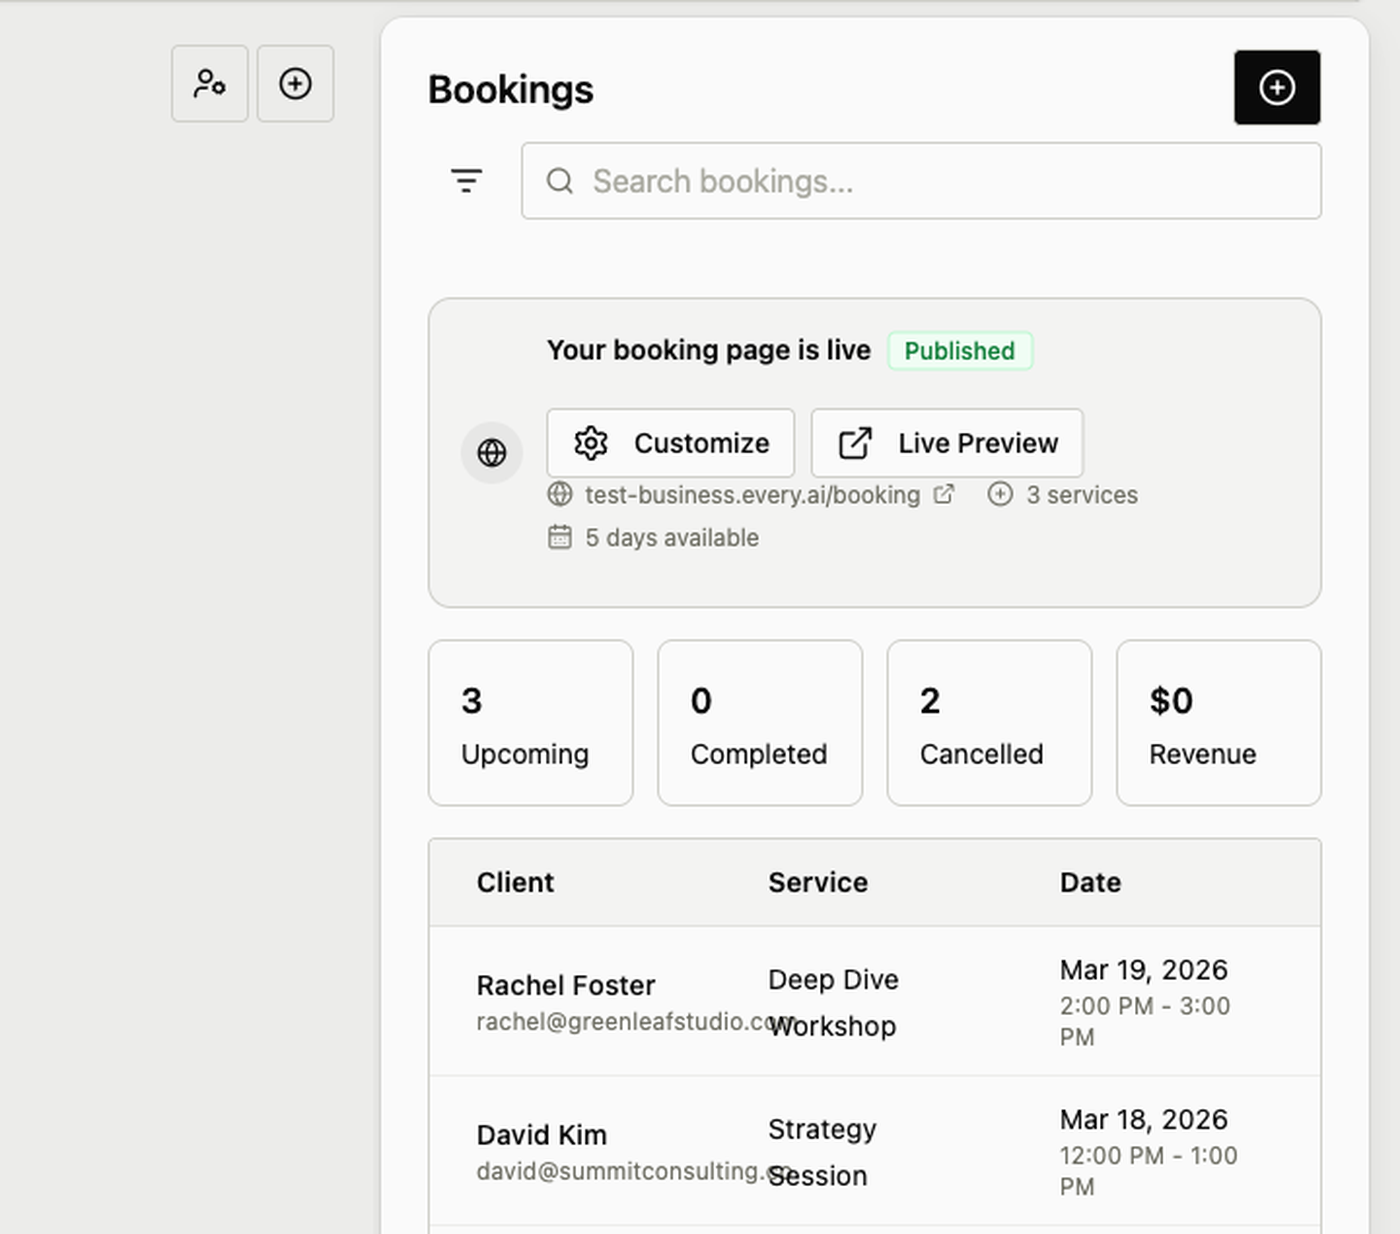 The bookings dashboard shows summary stats plus a table of all bookings with status, client, service, date/time, and payment info.
**Ask Every Agent:** Manage your schedule:
* "What bookings do I have tomorrow?"
* "Show me all unpaid bookings"
* "Reschedule the booking with ACME Corp to next Wednesday at 10am"
## Automated Emails
Every sends automated emails throughout the booking lifecycle:
| Email | When It's Sent |
| -------------------- | ------------------------------------- |
| **Confirmation** | Immediately after booking is created |
| **24-hour reminder** | 24 hours before the appointment |
| **1-hour reminder** | 1 hour before the appointment |
| **Cancellation** | When a booking is cancelled |
| **Reschedule** | When a booking is moved to a new time |
These emails work automatically and go to the email address the client entered during booking.
## Public Manage Page
Clients can cancel or reschedule their own bookings through a secure link included in confirmation and reminder emails. No login is required for that booking-specific manage flow.
Clients can:
* View booking details
* Cancel the booking
* Reschedule to a new available time
* Export the appointment to their calendar
## Integration with Your Data
Bookings connect directly with the rest of Every:
**Services:** Your booking page pulls from your existing services, so pricing and descriptions stay consistent.
**Contacts & Clients:** When someone books for the first time, Every automatically creates a contact and client record. Returning clients are matched to existing records when possible.
**Invoices:** When a client pays during booking, Every automatically creates a paid invoice linked to the booking.
**Client Portal:** If you use a branded subdomain, booking can live alongside your invoice, proposal, and client portal experience.
**Ask Every Agent:** Check booking-related records:
* "Show me the invoice for Sarah Chen's booking"
* "Find the client record created from last week's booking"
## Best Practices
Start with a small set of popular services, then expand once the flow is working well.
Keep availability current. Use date overrides for holidays and connect Google Calendar to avoid double-booking.
Require payment for higher-value sessions when appropriate. It reduces no-shows and shortens the path to cash collected.
Write a clear booking policy so clients know your cancellation rules and any prep expectations before they confirm.
## Common Workflows
**Paid Consultation:** Configure service with Standard mode and Pay at booking → Share link → Client books and pays → Confirmation sent → Calendar event created → Reminders go out automatically
**Free Discovery Call:** Configure service with Free mode → Share link → Client books → Confirmation sent → Meet with client → Follow up with a proposal or invoice
**Custom Engagement:** Configure service with Schedule Later mode → Client requests booking → You confirm a final time → Client receives confirmation → Reminders go out automatically
## Troubleshooting
**Clients do not see available times:** Check weekly availability, date overrides, and whether Google Calendar is blocking all open slots.
**Payment is not collected:** Verify Stripe is connected and the selected service is configured with payment enabled.
**Client did not receive confirmation:** Verify the email address entered during booking and have them check spam/junk folders.
**Calendar event not created:** Reconnect Google Calendar and verify calendar event creation is enabled.
## Next Steps
Create the services you want to make bookable
Accept payments when clients book
Sync calendar availability and create events
Use branded public links across bookings, invoices, and proposals
**Need help?** Contact support at [hello@every.ai](mailto:hello@every.ai)
The bookings dashboard shows summary stats plus a table of all bookings with status, client, service, date/time, and payment info.
**Ask Every Agent:** Manage your schedule:
* "What bookings do I have tomorrow?"
* "Show me all unpaid bookings"
* "Reschedule the booking with ACME Corp to next Wednesday at 10am"
## Automated Emails
Every sends automated emails throughout the booking lifecycle:
| Email | When It's Sent |
| -------------------- | ------------------------------------- |
| **Confirmation** | Immediately after booking is created |
| **24-hour reminder** | 24 hours before the appointment |
| **1-hour reminder** | 1 hour before the appointment |
| **Cancellation** | When a booking is cancelled |
| **Reschedule** | When a booking is moved to a new time |
These emails work automatically and go to the email address the client entered during booking.
## Public Manage Page
Clients can cancel or reschedule their own bookings through a secure link included in confirmation and reminder emails. No login is required for that booking-specific manage flow.
Clients can:
* View booking details
* Cancel the booking
* Reschedule to a new available time
* Export the appointment to their calendar
## Integration with Your Data
Bookings connect directly with the rest of Every:
**Services:** Your booking page pulls from your existing services, so pricing and descriptions stay consistent.
**Contacts & Clients:** When someone books for the first time, Every automatically creates a contact and client record. Returning clients are matched to existing records when possible.
**Invoices:** When a client pays during booking, Every automatically creates a paid invoice linked to the booking.
**Client Portal:** If you use a branded subdomain, booking can live alongside your invoice, proposal, and client portal experience.
**Ask Every Agent:** Check booking-related records:
* "Show me the invoice for Sarah Chen's booking"
* "Find the client record created from last week's booking"
## Best Practices
Start with a small set of popular services, then expand once the flow is working well.
Keep availability current. Use date overrides for holidays and connect Google Calendar to avoid double-booking.
Require payment for higher-value sessions when appropriate. It reduces no-shows and shortens the path to cash collected.
Write a clear booking policy so clients know your cancellation rules and any prep expectations before they confirm.
## Common Workflows
**Paid Consultation:** Configure service with Standard mode and Pay at booking → Share link → Client books and pays → Confirmation sent → Calendar event created → Reminders go out automatically
**Free Discovery Call:** Configure service with Free mode → Share link → Client books → Confirmation sent → Meet with client → Follow up with a proposal or invoice
**Custom Engagement:** Configure service with Schedule Later mode → Client requests booking → You confirm a final time → Client receives confirmation → Reminders go out automatically
## Troubleshooting
**Clients do not see available times:** Check weekly availability, date overrides, and whether Google Calendar is blocking all open slots.
**Payment is not collected:** Verify Stripe is connected and the selected service is configured with payment enabled.
**Client did not receive confirmation:** Verify the email address entered during booking and have them check spam/junk folders.
**Calendar event not created:** Reconnect Google Calendar and verify calendar event creation is enabled.
## Next Steps
Create the services you want to make bookable
Accept payments when clients book
Sync calendar availability and create events
Use branded public links across bookings, invoices, and proposals
**Need help?** Contact support at [hello@every.ai](mailto:hello@every.ai)